
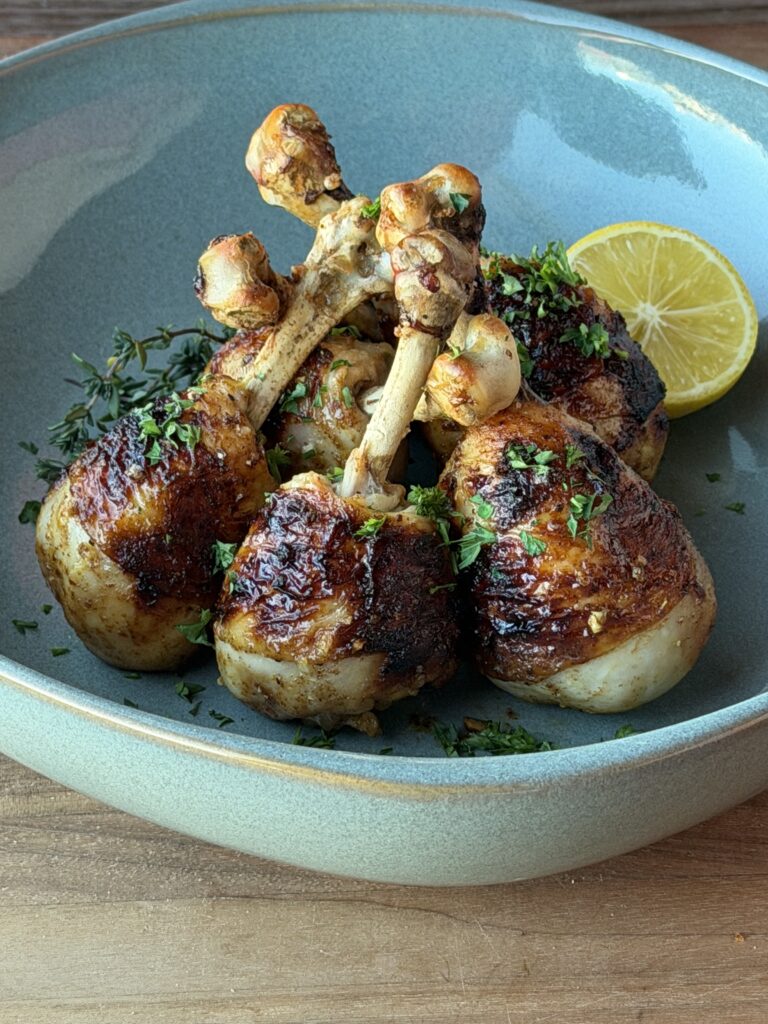
Lollipops. Irresistible.
Whether it’s delicate lamb chops or these delicious French-trimmed chicken drumsticks, a meat “lollipop” is just as fun to eat as it is satisfying. There’s something about that clean bone handle and perfectly caramelized exterior that makes them impossible to resist.
These crispy honey garlic herb chicken lollipops are guaranteed to become a favorite. And don’t be intimidated by trimming the drumsticks — it’s far easier than it looks.
One of the best things about social media is the constant stream of inspiration. I often cook intuitively, deciding what I’m craving in the moment. But every now and then, I’ll see a quick clip — three seconds on YouTube or Instagram — and suddenly I can’t get it out of my head.
That’s exactly what happened here.
I saw someone French-cut a drumstick — trimming away the skin, fat, and tendons from the narrow end to expose a clean bone. I had never seen chicken prepared this way before. They looked so tidy, so elegant, so… cute. I knew I had to try them.
And I was not disappointed.
These lollipops are absolutely worth the extra step. The Frenching not only makes them visually stunning, but it also helps the skin crisp beautifully in the oven. Finished with a sticky honey garlic glaze and a sprinkle of fresh herbs, they’re succulent, juicy, and packed with flavor.
What Are Chicken Lollipops?
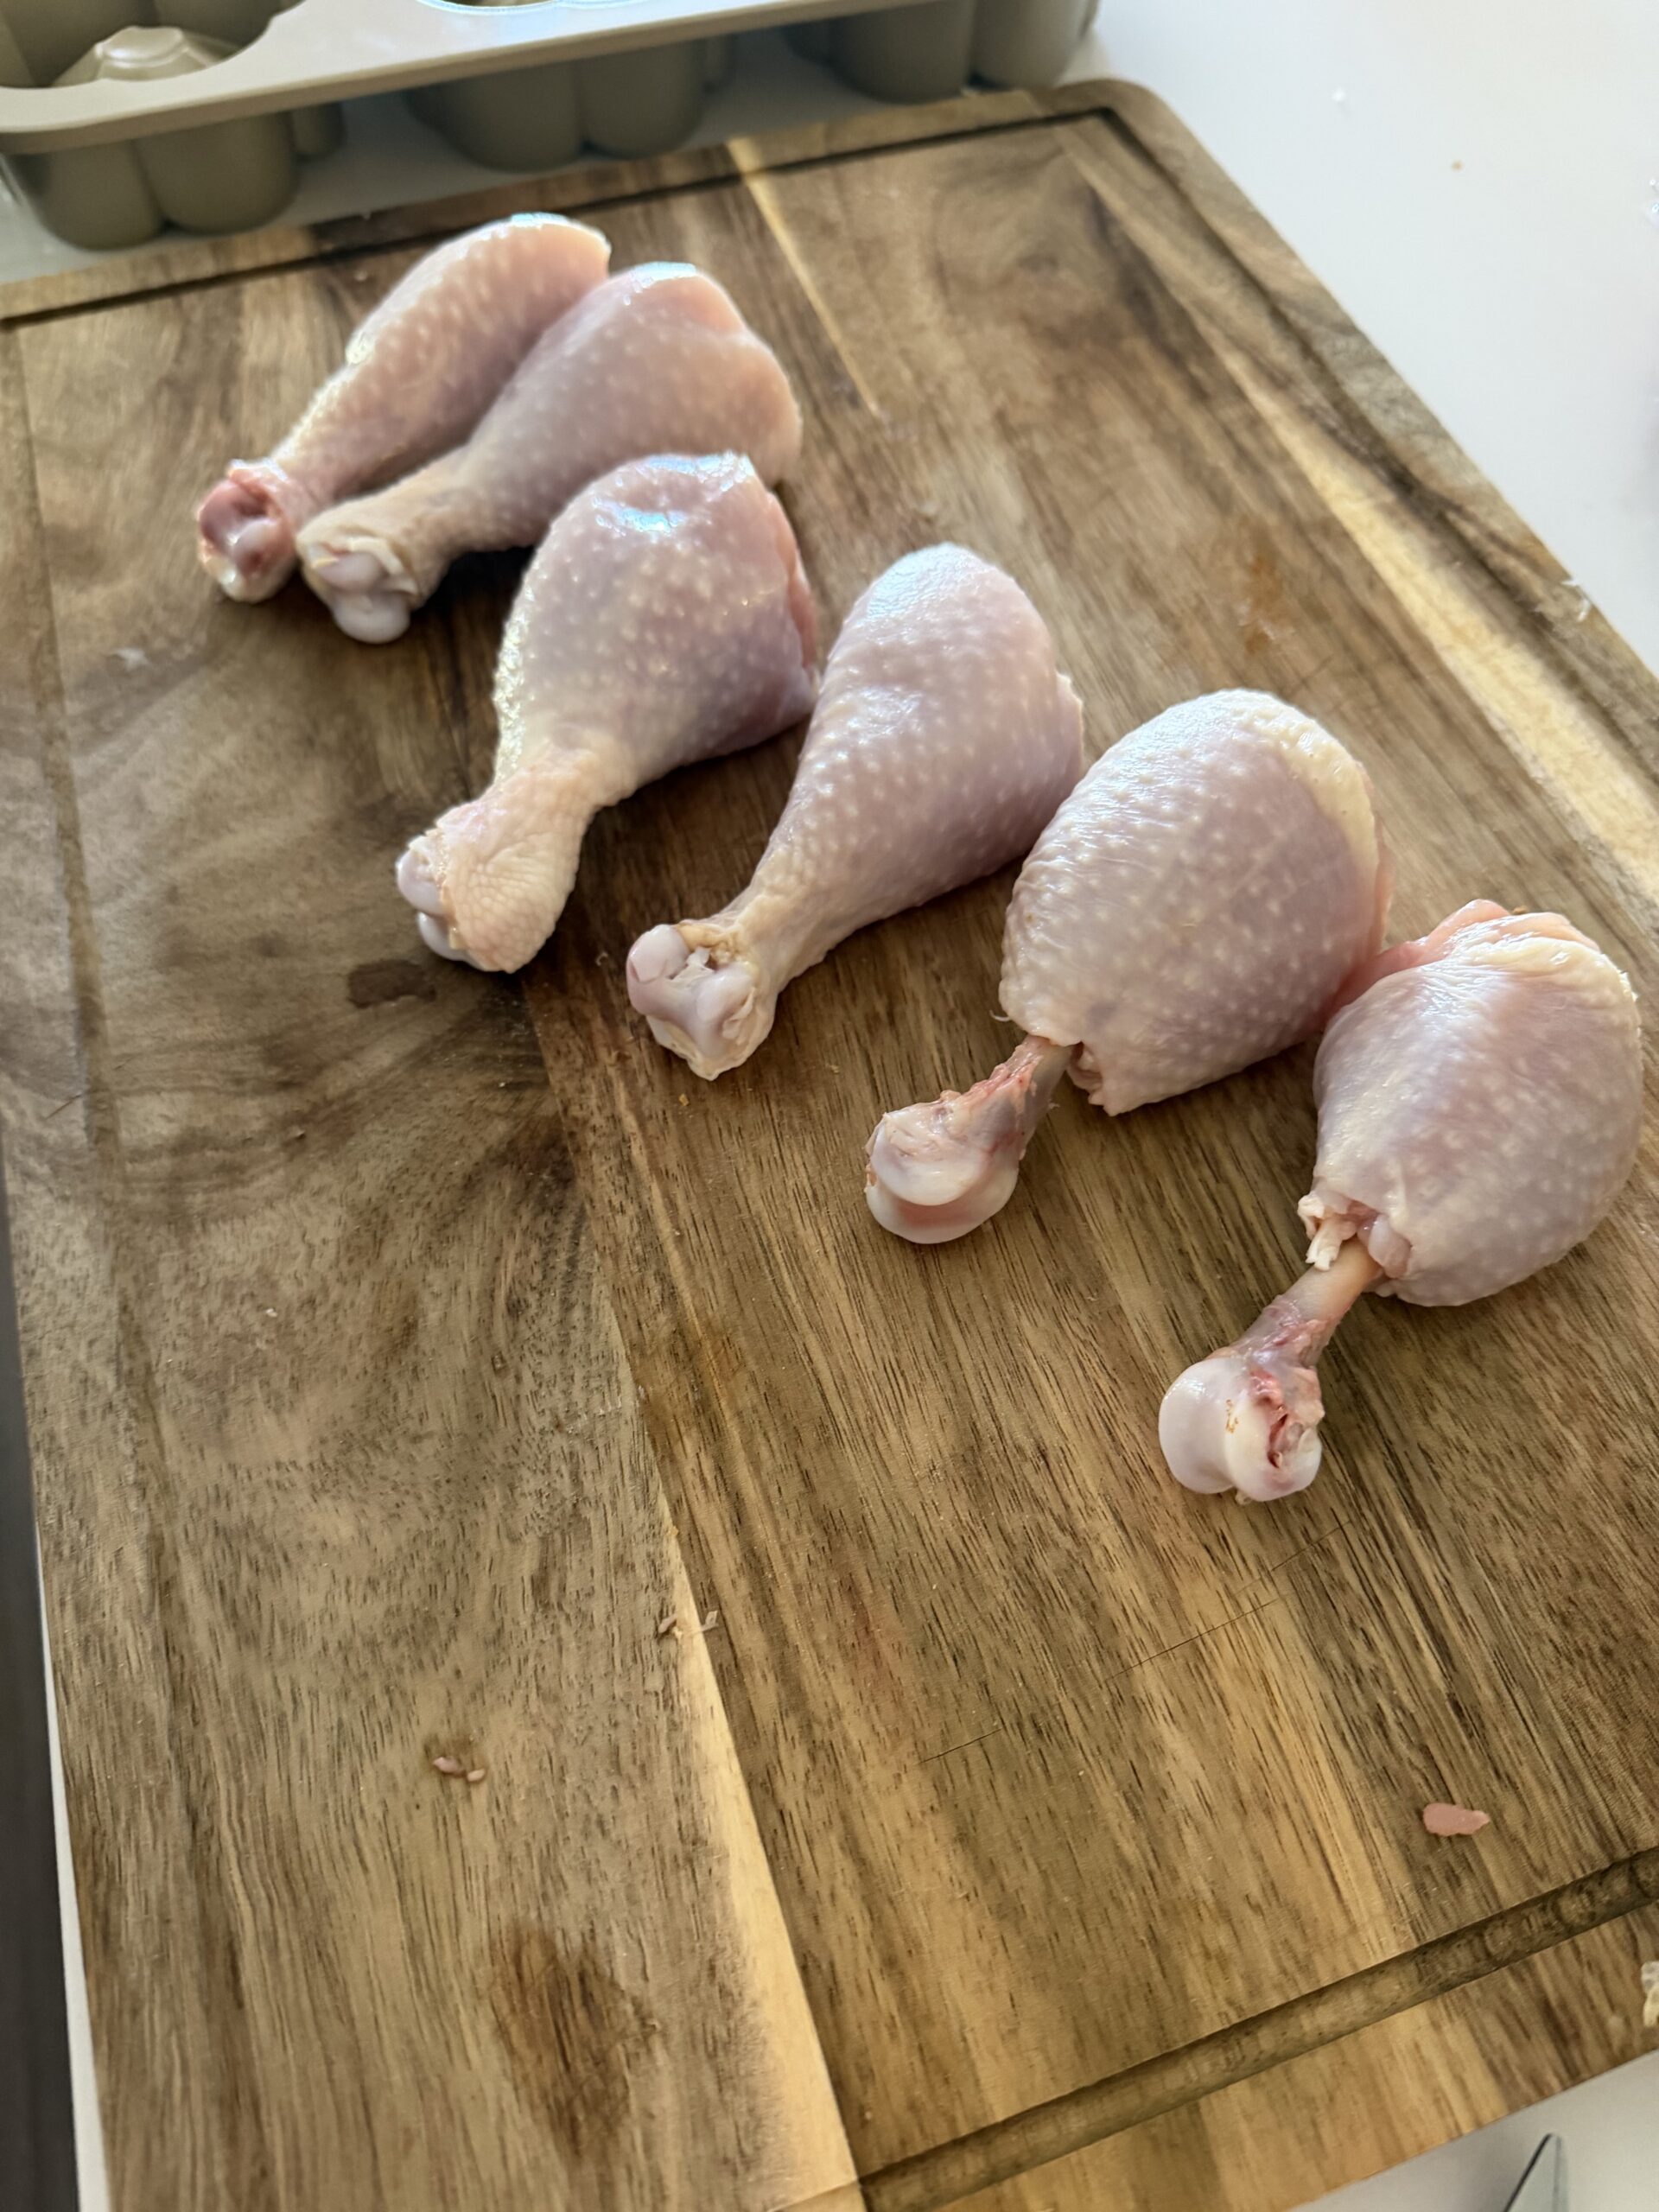
Chicken lollipops are drumsticks that have been “French-trimmed,” meaning the skin, fat, and connective tissue are removed from the narrow end of the bone. The meat is then pushed downward toward the thicker end, creating a rounded, lollipop-like shape with a clean bone handle.
This technique is often used in fine dining and catering because it transforms a simple drumstick into something far more elegant and visually appealing. Beyond presentation, Frenching the drumstick helps the meat cook more evenly and allows the skin to crisp beautifully in the oven.
The exposed bone also makes them easier (and more fun) to eat — no messy fingers required.
While the method may look intimidating at first, it’s surprisingly straightforward once you try it. With a sharp knife and a few confident cuts, you can transform an everyday pack of drumsticks into something that feels restaurant-worthy.
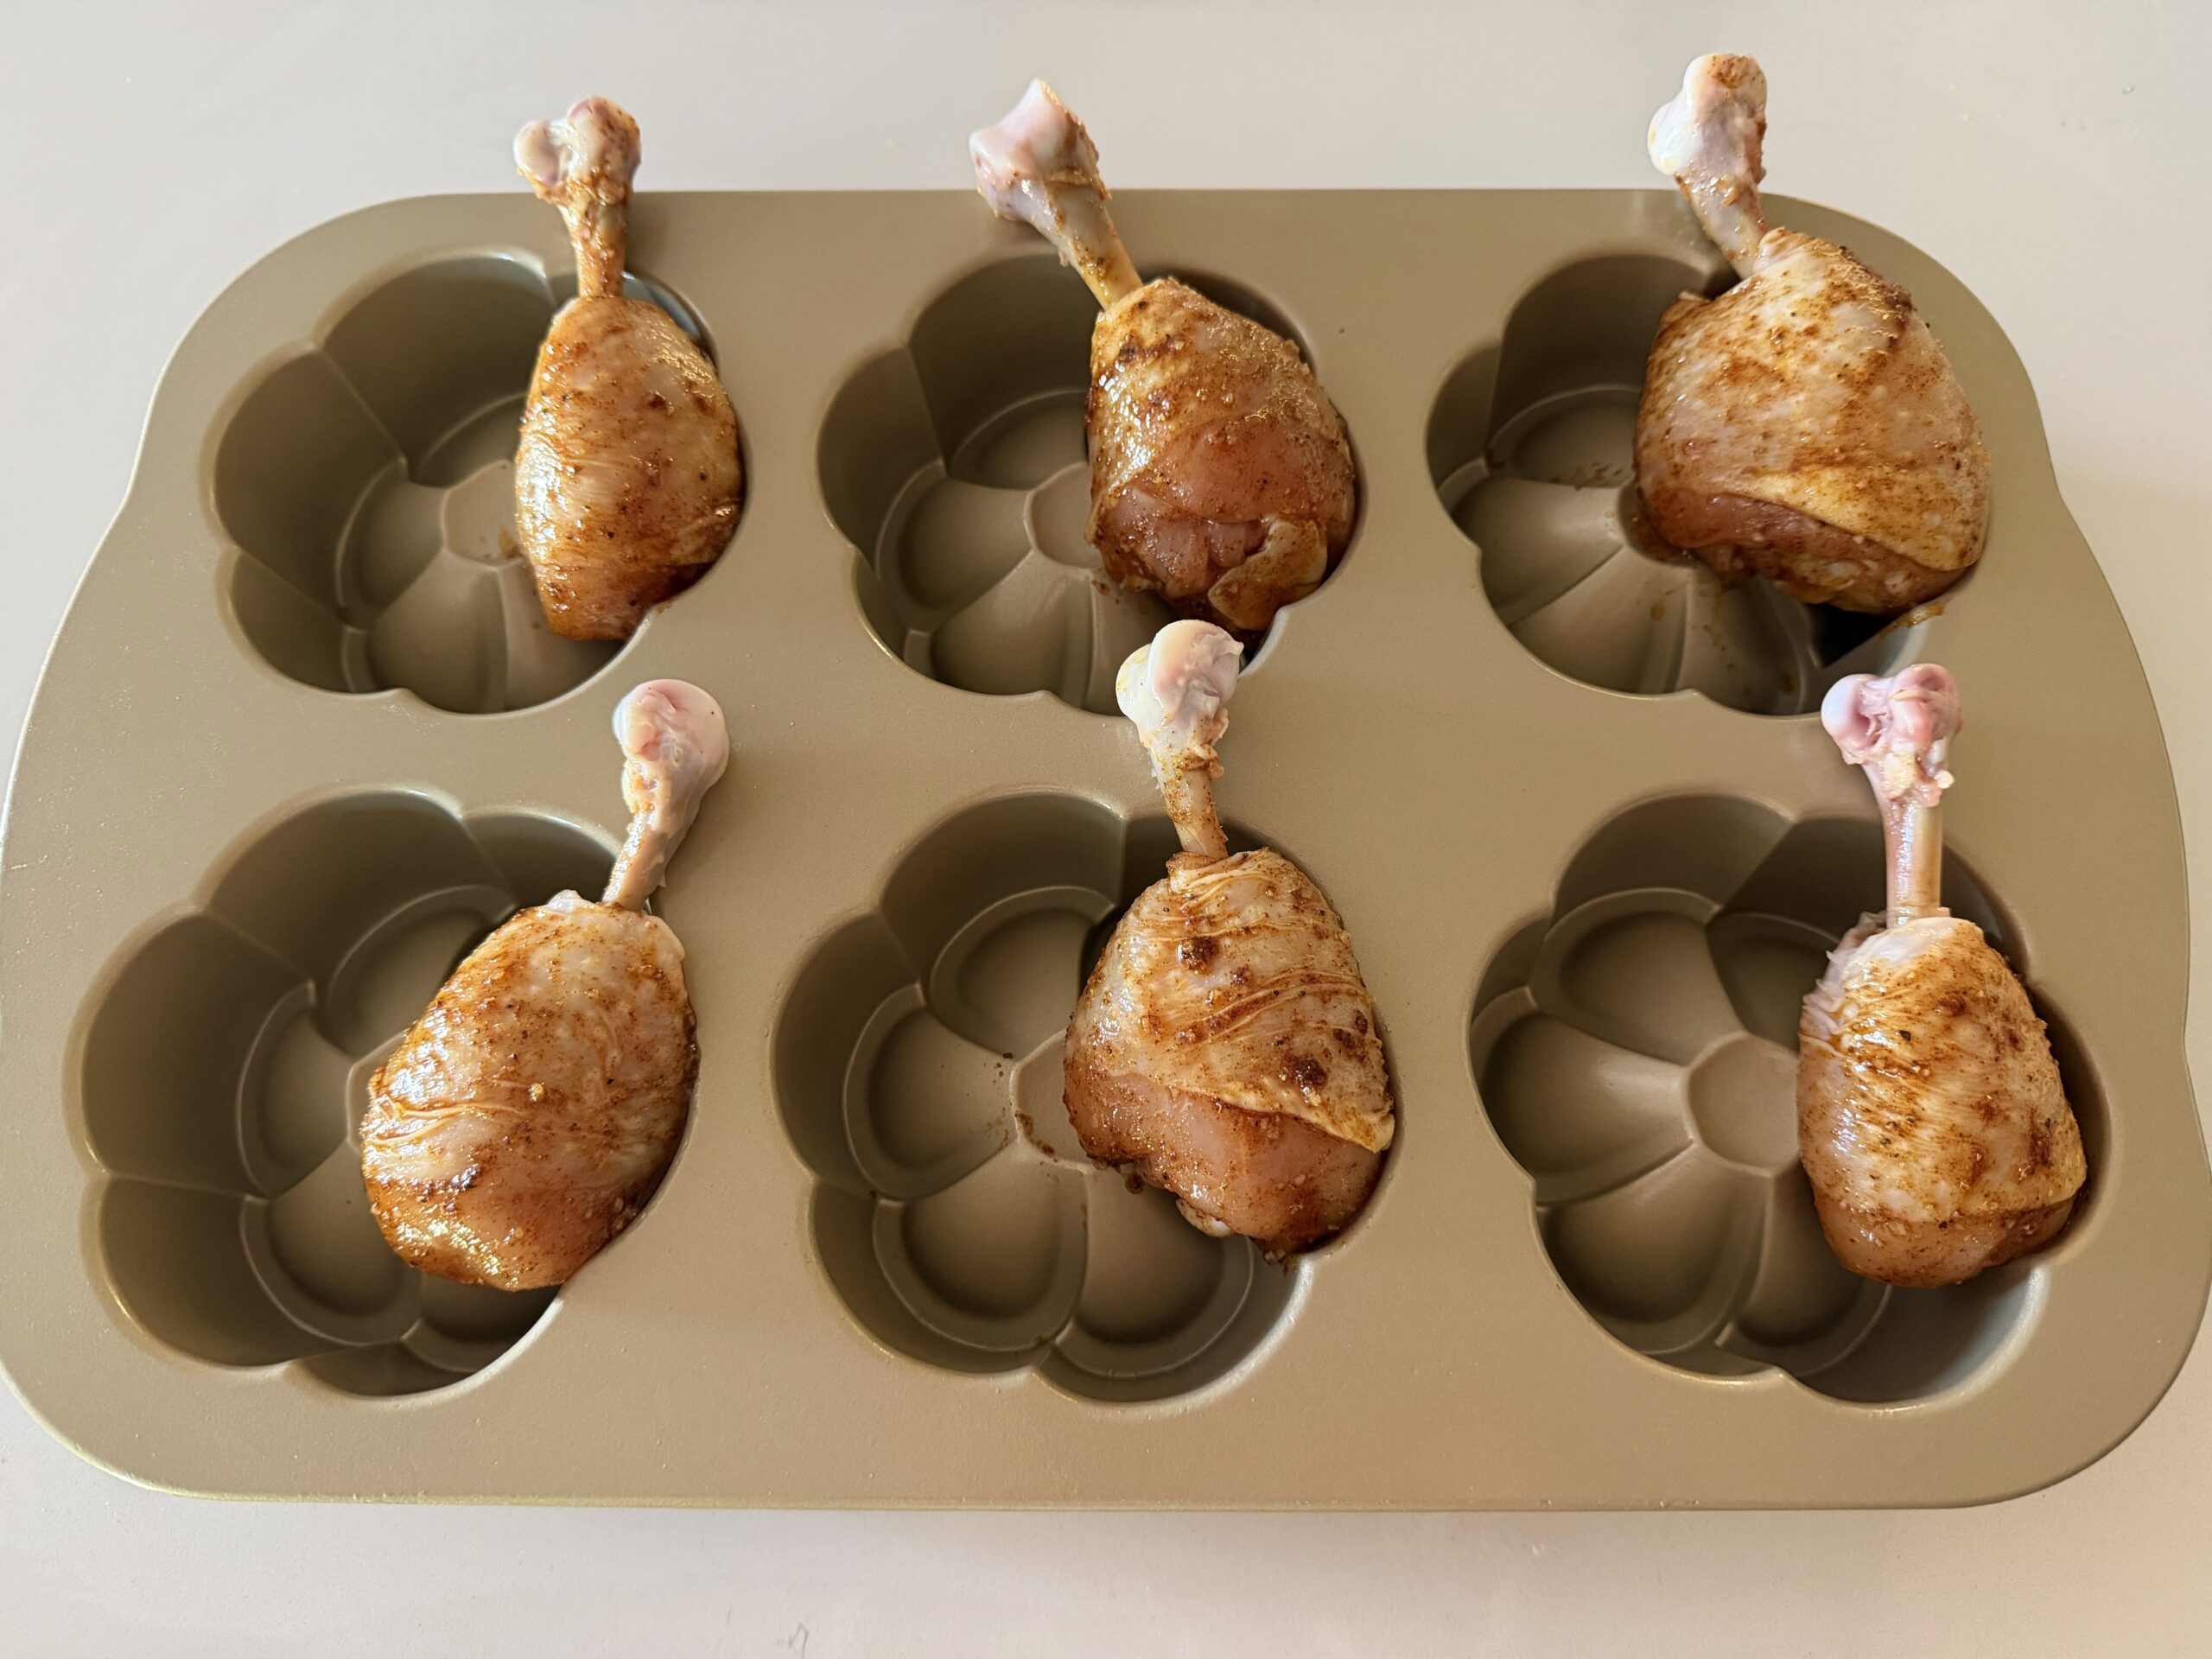
Why Use a Muffin Tin?
The muffin tin method is what takes these chicken lollipops from impressive to effortless.
By standing the French-trimmed drumsticks upright in a muffin tin, the heat circulates evenly around the meat while the fat naturally drips downward. This allows the skin to crisp beautifully without sitting in rendered fat.
It also keeps the drumsticks stable and upright as they roast, preserving that clean, elegant “lollipop” shape. No flipping, no fussing, and no crowding on a sheet pan.
The result? Evenly cooked chicken with deeply golden, caramelized skin and a glossy finish once glazed.
It’s a simple trick that delivers restaurant-style presentation with very little extra effort — exactly the kind of method worth keeping in your back pocket.
How to French a Chicken Drumstick
Frenching a drumstick simply means trimming away the skin, fat, and connective tissue from the narrow end of the bone to create a clean “handle.” It may look technical, but it’s surprisingly straightforward once you try it.
Here’s how to do it:
- Locate the narrow end of the drumstick.
About one inch from the bottom, use a sharp knife to cut all the way around the bone, slicing through the skin and tendons. - Scrape and trim.
Once you’ve cut around the bone, use your knife to scrape downward, removing any loose fat, cartilage, or small bone fragments. - Push the meat downward.
Grip the drumstick and gently push the meat toward the thicker end. It will naturally form a rounded “lollipop” shape. - Clean up the bone.
Trim away any remaining bits of skin or tendon from the exposed bone so it looks neat and polished.
That’s it.
After one or two drumsticks, you’ll get the hang of it. The transformation is dramatic — and absolutely worth the extra five minutes.
Tips for Perfectly Crispy Skin
Crispy skin is the difference between good chicken and unforgettable chicken lollipops. Here’s how to make sure yours turn out beautifully golden and caramelized every time.
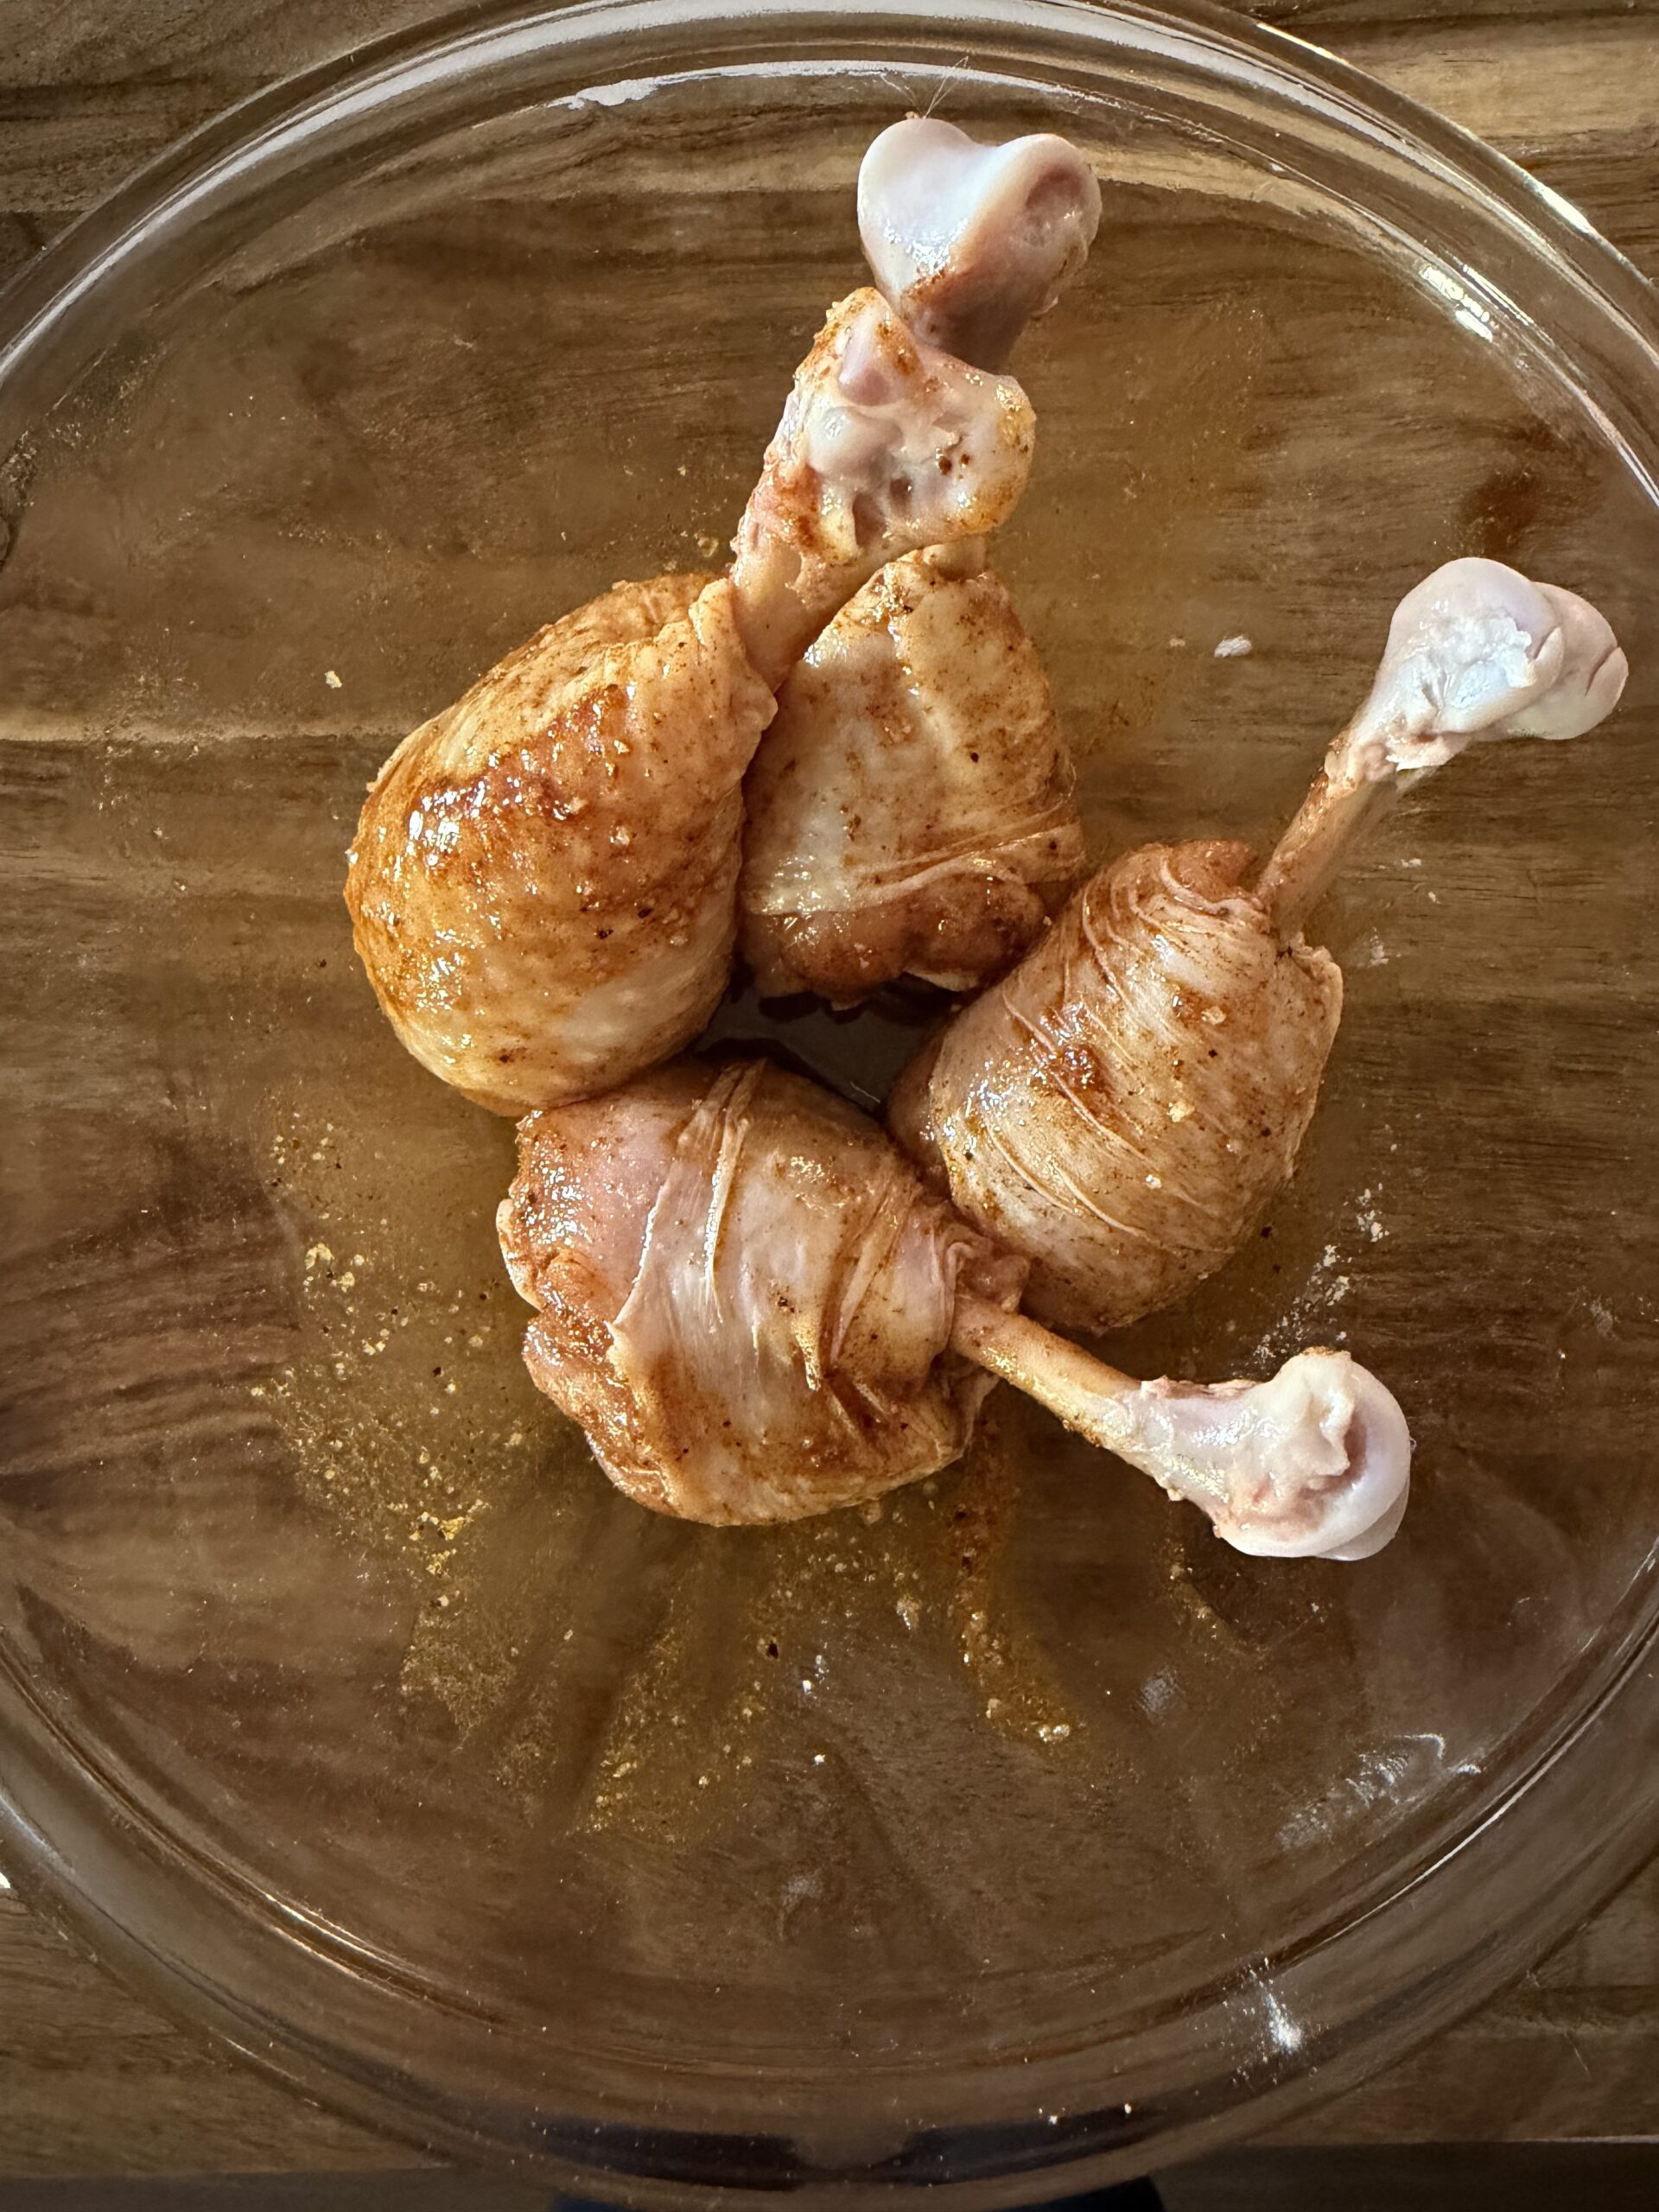
1. Pat the chicken completely dry.
Moisture is the enemy of crispness. Before seasoning, thoroughly pat the drumsticks dry with paper towels. This step alone makes a dramatic difference.
2. Don’t overcrowd the pan.
Using a muffin tin allows each drumstick to stand upright with space around it. Air circulation is what helps the skin crisp instead of steam.
3. Roast at a high temperature.
425°F is ideal. Lower temperatures will cook the chicken through, but they won’t render the fat properly or crisp the skin.
4. Glaze at the end — not the beginning.
Honey contains natural sugars that caramelize quickly. Brushing the glaze on only during the final minutes of roasting prevents burning and keeps the exterior glossy rather than charred.
5. Finish under the broiler (carefully).
One to two minutes under the broiler adds that final sticky, golden finish. Stay close — honey can go from perfect to burnt very quickly.
When done correctly, the skin should be deeply golden, slightly blistered, and lightly sticky from the glaze — crisp on the outside and juicy underneath.
Why You’ll Love These Chicken Lollipops
These chicken lollipops are charming, crispy, and full of rich, flavorful dark meat. They’re elegant enough to serve for guests, yet simple enough for a weeknight dinner.
The skin turns deeply golden and slightly sticky from the honey garlic glaze, while the inside stays juicy and tender. Each bite delivers the perfect balance of savory, sweet, and herbaceous notes.
They’re high in protein, incredibly satisfying, and surprisingly light — especially when paired with fresh, vibrant sides.
What to Serve with Chicken Lollipops
These pair beautifully with:
• A simple arugula salad with lemon and shaved Parmesan
• Roasted cherry tomatoes with burrata and pesto
• Crispy smashed potatoes
• Warm sourdough bread to soak up extra glaze
• A bright cucumber and herb salad
For a lighter dinner, serve alongside a fresh green salad and a glass of crisp white wine.
For something heartier, add roasted potatoes or a simple grain like quinoa.
Crispy Honey Garlic Herb Chicken Lollipops
These crispy honey garlic chicken lollipops are French-trimmed drumsticks roasted upright for beautifully golden, caramelized skin. Finished with a glossy honey garlic glaze and fresh herbs, they’re tender, juicy, and irresistibly sticky — the perfect balance of savory and sweet.
Ingredients
Instructions
-
French the Drumsticks
Using a sharp knife, cut around the narrow end of each drumstick, slicing through the skin and tendons. Scrape downward and push the meat toward the thicker end to create a rounded “lollipop” shape. Trim away any loose bits for a clean bone handle.
-
Pat Dry & Season
Thoroughly pat the drumsticks dry with paper towels.
-
-
-
Rub with olive oil and evenly coat with salt, pepper, paprika, and garlic powder.
-
Arrange in Muffin Tin
Place each drumstick upright in a muffin tin cavity, bone side up. This allows the fat to drip down and the skin to crisp evenly.
-
Roast
Preheat oven to 425°F (218°C).
-
-
-
Roast until golden and cooked through
-
Smaller organic or air-chilled drumsticks: 22–25 minutes
-
Standard supermarket drumsticks: 30–35 minutes
-
Internal temperature should reach 165°F at the thickest part.
-
The skin should be golden and starting to crisp before glazing.
-
Glaze
Whisk together honey, olive oil (or butter), garlic, lemon juice, and a pinch of salt.
-
-
Brush the glaze generously over each drumstick.
-
Return to oven for
5–8 minutes (smaller drumsticks closer to 5 minutes)
-
-
Broil for Finish
Switch to broil and cook for 1–2 minutes, watching carefully.
-
-
The glaze should bubble and caramelize, creating a glossy, sticky finish. Do not walk away — honey can burn quickly.
-
Rest & Finish
Let rest for 5 minutes.
-
-
Sprinkle with fresh thyme or parsley and optional lemon zest before serving.
-
If you have extra glaze, warm it gently and stir in fresh thyme for a simple dipping sauce.
